Protecting Your Data Through Regular Backups
As the database administrator for your organization's implementation of an enterprise database in any ReliaSoft desktop application, you have the ability to perform the backups and other maintenance activities necessary to protect the information stored in the SQL Server database. Please refer to the SQL Server documentation for detailed coverage of this topic. In addition, this document provides specific instructions for two ways that you can perform backups: on demand or scheduled.
To quickly jump to sections in this document, use these links:
Create a Backup on Demand Using SQL Server Management Studio Express
Automate Backups Using SQL Server Management Studio Express and Windows Task Scheduler
Note: These instructions were prepared using SQL Server Express 2008 and Windows XP. The options may vary if using SQL Server Express 2005, Windows Vista or Windows 7.
Important: While the pictures in this document show Xfmea, the same instructions apply to any ReliaSoft database.
Create a Backup on Command Using SQL Server Management Studio Express
The free SQL Server Express Edition provides the option to create database backups on command through the SQL Server Management Studio Express.
Open SQL Server Management Studio Express.
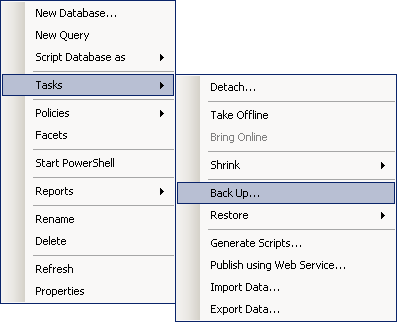
Expand Databases, then right-click the application database.
Choose Tasks > Back Up from the shortcut menu.
-
-
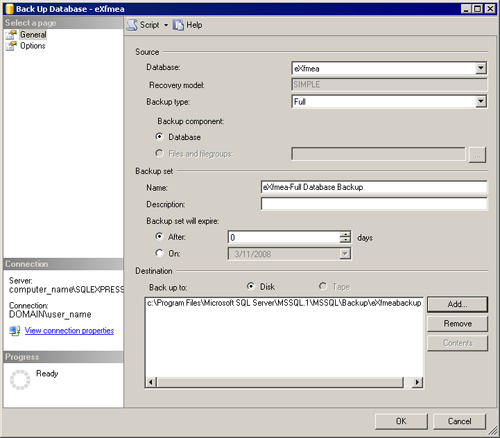
Enter your preferences in the Back Up Database window and then click Add, which will allow you to specify the location and the filename of the backup that will be created.
Note: Make sure that the file name you create ends with the .bak extension (e.g., eXfmeabackup.bak) or SQL Server will not recognize this file if you need to use it to restore the database.
-
The filename and location will appear in the window below the Destination header. Make a note of where this file is being saved so you can locate it to restore your database, if needed.
Repeat these steps each time you wish to manually initiate a backup of your database or continue to the next section to see how to automate this process and run the backups on a schedule.
Automate Backups Using SQL Server Management Studio Express and Windows Task Scheduler
The free SQL Server Express Edition does not provide a built-in utility to schedule automated backups. However, there is a workaround that can be set up using the Task Scheduling feature built into Windows. After using the steps above to create an on demand backup, you can create a script that will automate the backup process. Use the following steps to create an automated backup schedule for your database.
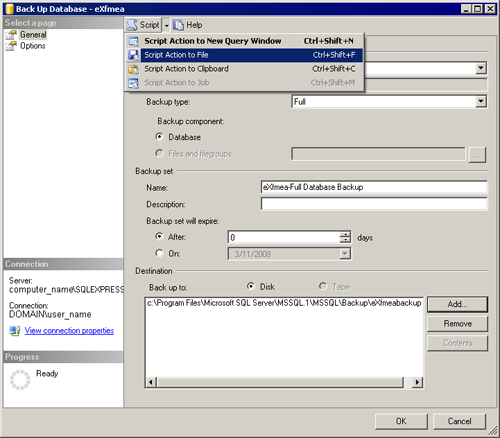
By following the steps described above, you have already selected the settings and the destination for the backup file, so you now need to generate the script that will allow you to automate the running of the backup. To do that:
Click the arrow to the right of the Script menu at the top of the window and then choose Script Action to File. This will create a simple text file (with a .sql extension) that contains the instructions required to perform the backup and save it to the pathname/filename that you specify. Be sure that this file is stored in a safe, accessible location because this is the file that Windows Task Scheduler needs to point to in order to automate the backups. Make sure to note the location for the final step.
After you have created the .sql script file (that will run the backup), click OK and then exit SQL Server Management Studio Express.
Open the Windows Task Scheduler by clicking Start > Programs > Accessories > System Tools and then choose Scheduled Tasks. (You can also find Scheduled Tasks in the Control Panel.) In this window, double-click Add Scheduled Task. The Scheduled Task Wizard will walk you through the next steps.
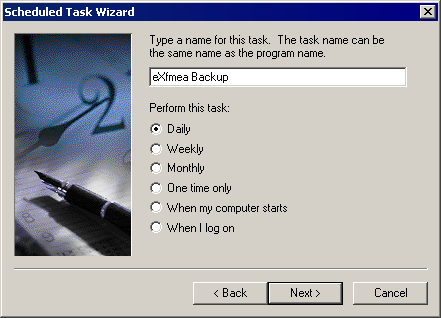
When prompted for the program that you want Windows to run, click Browse and then go to the SQL installation location to select sqlcmd.exe (in default installations, the file is found here: C:\Program Files\Microsoft SQL Server\90\Tools\Binn). Create a name for the scheduled task (we have used "eXfmea Backup" in our example) and then specify the frequency of your desired backups. Click Next.
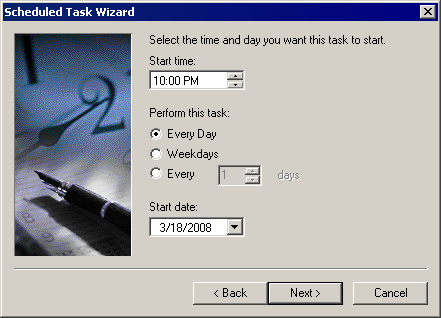
Select the time and days when you wish the task (the backup) to run. Click Next.
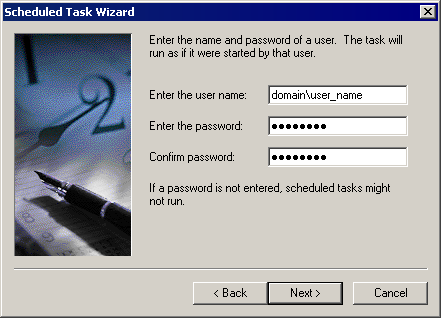
When prompted, type the login information and password (this must be an account with administrative rights on this computer). Click Next.
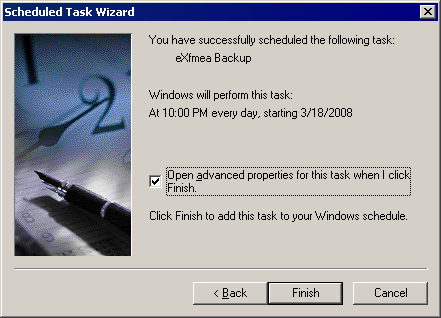
In the final step of the wizard, select the check box that says "Open advanced properties for this task when I click Finish." This will allow you to add the reference to the script that you created in SQL Server Management Studio Express. Click Finish.
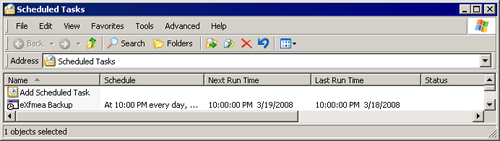
If you missed the check box in the previous step, just double-click the newly created task in the Scheduled Tasks window.
Configuring the Scheduled Task to Run the Database Backup Script
After completing the wizard (or double-clicking the task in the Scheduled Tasks window), you will see the properties of the task you have created.
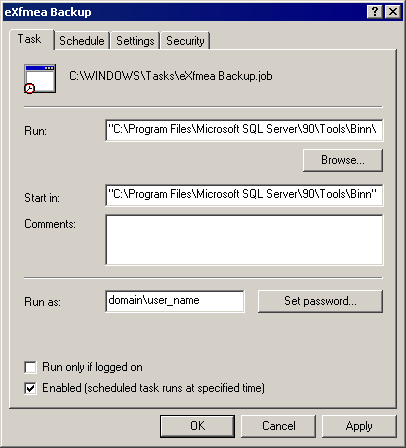
On the Task page, you will need to add information at the end of the existing text in the Run field. Click inside the field and use the right arrow key to scroll all the way to the right (or press the End key). Type or copy/paste the following text after the final quote in the Run line:
-S \sqlexpress -i
Note: "-S" tells the task which instance of SQL server to back up (\sqlexpress if the default was used during the SQL setup) and "-i" tells it which input file to run on the server. (The input file is the name/location of the .sql script file we created for the on demand backup. We will add the name of that file to the end of this line in the following step.)
In the same field, and after the line you just typed or pasted, type the location of the script file that you created using SQL Management Studio Express. If you called the file "sqlbackup.sql" and saved it in the root of your C:\ drive, then you would type this (using the quotes):
"C:\sqlbackup.sql"
The full Run line will look similar to this:
"C:\Program Files\Microsoft SQL Server\90\Tools\Binn\SQLCMD.EXE" -S \sqlexpress -i "C:\sqlbackup.sql"
You can adjust when the task runs by clicking the Schedule tab and making changes. On the Task tab, if you have an account with a password that periodically expires or changes, you can click the Set password button to update your password.
Note: You will not be notified if the scheduled task does not complete successfully. You will have to come back to the Scheduled Tasks window to view the scheduled time, next run time and last run time. If your password has expired or changed, the task will not run.
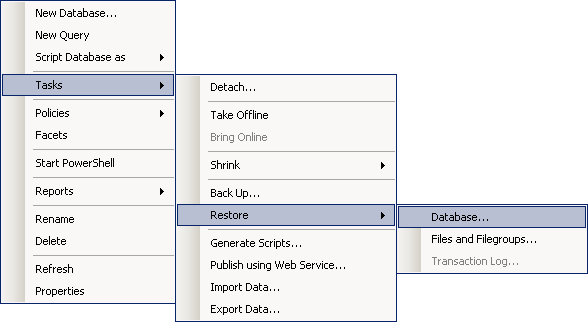
To recover the data from one of the backups:
Open SQL Server Management Studio Express.
Expand Databases, then right-click the application database.
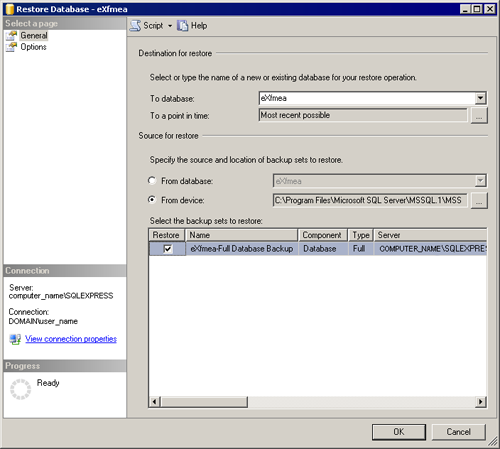
Choose Tasks > Restore > Database.
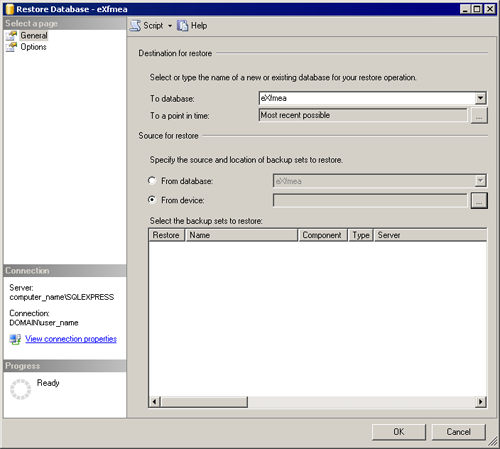
In the Restore Database window, select From device: and then click the ... button to the right of the field.
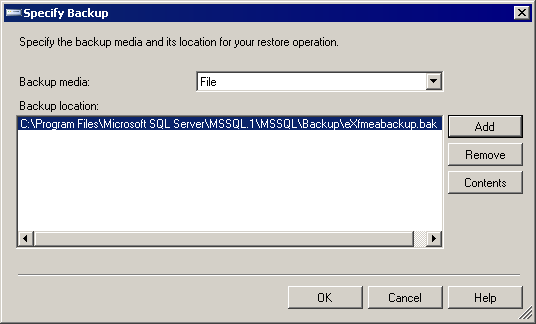
Click Add and then browse to the location of the backup file and select it (in our example, the default location for the backup is used). Click OK to close the browse window. Click OK to close the Specify Backup window after it shows the file in the Backup location field, as shown below.
In the Restore Database window, select the remaining options appropriate for your restoration and then select the Restore check box in the Select the backup sets to restore: field. Click OK to restore the data from the selected backup.
If you have any further questions about how to use ReliaSoft database with SQL Server, or if you experienced any problems with this instruction document, please contact technical support.
Additional online support for SQL Server Express can also be found at this location:
SQL Server Express Forums: http://social.msdn.microsoft.com/Forums/en-US/sqlexpress/threads
